
My wife got a new car! Excellent, it has all the bells and whistles, on-star, android auto, those dumb key fobs that let you unlock your car/drive without removing them from your pocket, and the option to pay $15/month to remote start the thing from your phone (there’s a few other features).
In an effort to get back at “The Man” and upgrade my 2013 Silverado, I decided to make my own remote-start app.
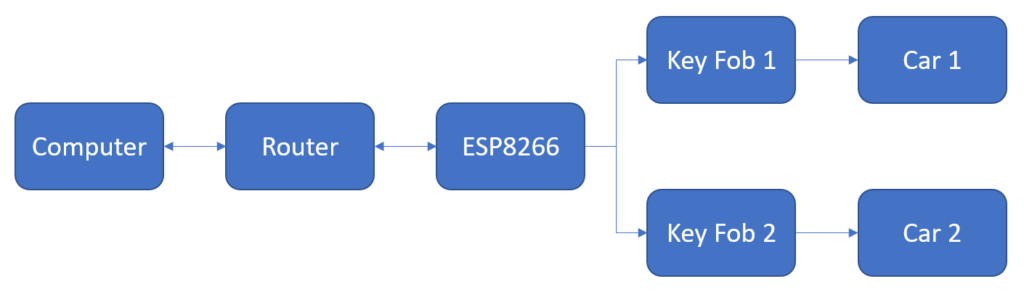
The premise is simple, I want to be able to lock, unlock, and start my vehicles remotely. I also want to be able to schedule a remote-start. Where we live, the vehicles are ALWAYS parked outside. Winter’s aren’t as harsh as when I used to live up north, but it’s nice to a) have a warm vehicle to scrape the snow off, and b) have a warmed-up vehicle to reduce wear-and-tear when the fluids are thicker than molasses.

I wrote the CSS and HTML from scratch (with the help of a few websites noted later in this article). This project was a good exercise in learning AJAX. From an EE point of view, it’s surprisingly easy.
Required Components
- One or More remote-start capable vehicles.
- Sacrificial key-fobs
- What the hell is up with the cost of new key fobs? $150 for an extra for my wife’s car!
- If you buy a new set, you’ll probably have to take them to a dealer to get them programmed.
- An ESP8266. I am using a Wemos D1 Pro knockoff from AliExpress
- In hindsight, just buy a legit Wemos D1 from Amazon or whatever.
- Soldering Iron.
- Solder.
- A 3D printer.
- Some bits of wire.
Warnings and Limitations
Common sense ain’t all that common, so I feel like I have to warn you (the reader/maker/builder/user) not to try this yourself. Why? Let’s say you park your vehicle inside a garage. Let’s also say you have an auto-start scheduled for 5AM. You’re sleeping in your bedroom above the garage, your car starts, you don’t notice, and suddenly you’re in the obituaries as “That dumbass who accidentally killed himeslf/others.” “But…”, you may tell yourself, “I’m not dumb enough to do that!”. Well, consider that this code implements 7 different libraries and uses features I have not thoroughly tested or verified as good. Also, consider that my code, as it’s written, allows over-the-air updates from anyone on your local network. Even if you don’t die as a result of someone hacking this, you’ve just left your vehicle more venerable to theft.
This is one of those dumb projects that I just HAD to do. There is precedent here: Who the hell pays $15/month to remote start their car? Not me.
Okay now the limitations:
- The Wemos D1 Mini hardware can support up to 3 key fobs (lock, unlock, and start connected). My code only has provisions for 2 users.
- The webpage is COMPLETELY unsecured. Literally anyone on your network with an IP address (hell, mDNS hostname: http://cars.local) can connect and start/unlock your vehicles.
- The code is a complete bodge-job but I have to say I’m proud that I wrote the CSS by myself.
- This doesn’t give your car superpowers, it’s just hooking an arduino up to your key-fob. As a result you cannot:
- Start your vehicle from your phone when you’re at work (away from your wifi network)
- Schedule a remote start time while your vehicle is away from the base station
Hardware
Key fobs always interested me because they’re these tiny coin-cell powered devices with an absolutely minimal number of components, they have a range of 100’s of feet, and they last for months/years! It’s the type of EE I can get behind. Now it’s our turn to reverse engineer them. What gets me are these devices are ALWAYS powered on. Sipping micro/nano amps from the coin cell when waiting for a button press.
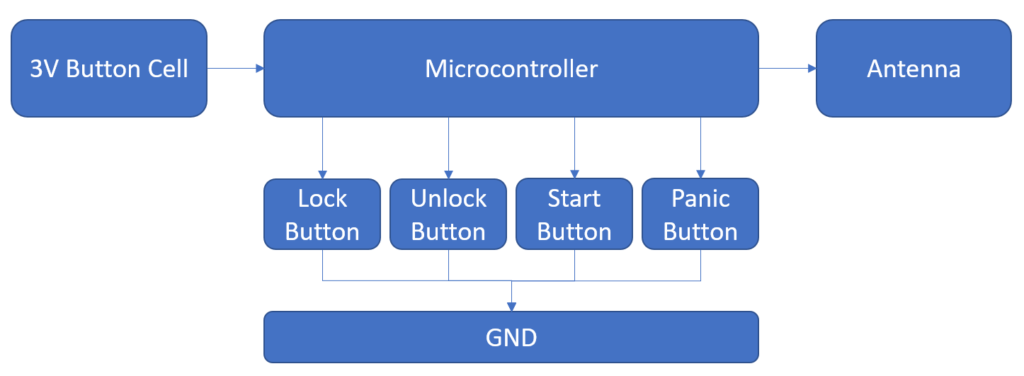
The microcontroller in the remotes is pretty obscure. I was unable to find a datasheet on the elusive chip, but I was able to make some educated guesses with a multimeter
- The microcontroller is always powered on
- All 4 inputs are pull-up
- It’ll probably handle 3.3V
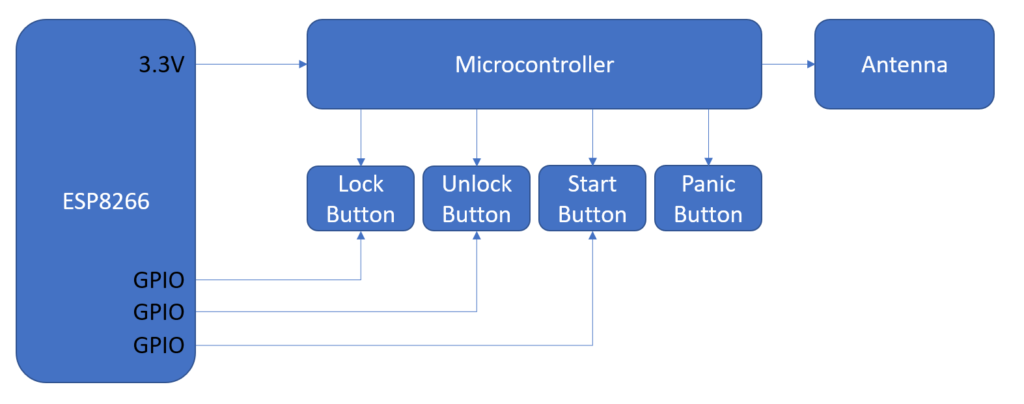
The GPIO pins are initialized high (3.3V) as the microcontroller is looking for a “low” (0V) signal for a button press. When you want to press a button, toggle the GPIO pin low. Easy! We do this hookup twice, once for each remote.

Code
I’ll keep this section short as I have the code on Github.
The code needs to do 5 things:
- Host a website
- Toggle some GPIO
- Keep time
- Hold a schedule
- OTA Firmware Updates
Hosting a website, toggling GPIO, keeping time, and OTA firmware updates are very common things people want a microcontroller to do. The base code is available as libraries which I import.
Scheduling turned out the be the most difficult part of this project. There’s a library called alarms which is complete trash for the ESP8266 as you need to use alarm_delay instead of regular delays. This causes the ESP to crash frequently.
I still haven’t quite figured out the bug yet. But I need to publish this blog post before winter hits. I’ll publish an update to this post when I figure out why time keeps slipping away for starts >24 hours in the future.
The code is available on my github here.
Webcode
Most of the web design I do is derived from html5up.net. It’s a great resource for getting simple webpages going for people you care about. Well, I wanted a proper course in web design as I’ve been using templates for years and have never formally taken a web design course. I started with the basics of CSS and built little widgets as I went along. I use brackets.io for code editing and live previews of changes I make. It’s very handy and keeps me from uploading useless code to the ESP.
One of the more handy things I was able to learn was the use of AJAX. Which let’s parts of my webpage be refreshed on command. Kind of like a data stream. There’s a great tutorial here for implementing this.
Once a website was created, I was able to flash all of the page data and resources onto the ESP8266 via this handy tutorial.
Mechanical Design
I really didn’t go all-out on this design. I really needed a box that could be mounted to a wall and hide my hideous wiring job. It serves that purpose. Again, the files are available on my github if you feel like following in my steps.
Conclusion
This was a really fun project involving my new favorite microcontroller. I was able to make something useful and web-based. There are still some bugs in the code I am trying to stomp out, but things are working well enough for me to get some use out of this system on my smart phone. Again, I wouldn’t recommend this if there’s ANY chance you’ll be parking in your garage or if you care about your vehicle getting broken into. Code like this should not be responsible for safety or security and there’s a good chance you’ll forget about this device a few months after building it.